Making Colour Separations (entry by David Bull)
|
|
|
|
|
The picture on the right illustrates what is known in Japanese as a kyogo. It is an impression taken from the finished key block, printed in thin sumi ink. A thin but strong paper is used for these kyogo. In the old days a thin minogami was used, but as this is extremely difficult to handle, and the slightest error will make the resulting colour blocks useless, I use a slightly thicker paper called hodomura, which has the necessary characteristics for making good kyogo - it has a smooth front surface allowing fine detail to show, it is not overly subject to expansion and contraction, and it is readily abraded from the back (see below). I request that it be quite heavily sized, and then before using it I 'kill' it with a baren by rubbing it vigorously against a smooth uncarved block. |
| |
|
|
|
|
|
|
How many kyogo will you need? One for each colour block. This is not necessarily the same as the number of colours in the finished print, as in some cases two or more colours can be included on one kyogo (see below). | |
|
|
|
|
|
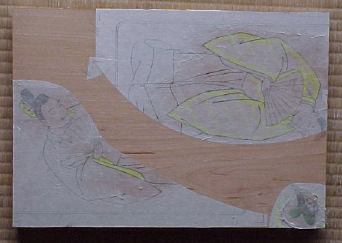
On each kyogo 'colour in' the areas where you wish one colour to appear. (This particular photo actually shows a two-colour kyogo. The 'tail' of his hat, and the inner sleeve of his kimono will be different colours in the finished print. But they can be combined on one colour block, because they are far enough apart to allow separate brushing.) |
| |
|
|
|
|
|
|
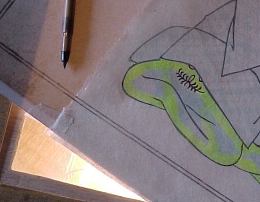
For this print, there is a pattern on the clothing that did not appear in the key block. It must now be drawn on one of the kyogo. My carving bench has a 'window' in it, and this is used as a light table - the kyogo is taped over the original photograph, and the pattern then traced. | |
|
|
|
|
|
Note also that the yellow marker does not completely fill in the designated area. This is to avoid saturating the paper with the fluid, and thus causing wrinkles and expansion - both of which would cause trouble later. |
| |
|
|
|
|
|
|
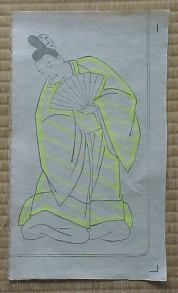
One of the finished kyogo. Note also that these sheets are printed in a different way than 'real' prints. When making a normal print, the paper is slipped into the kento (registration) marks. But when printing a kyogo, the paper is laid on top of those marks (which are also brushed with pigment). The registration marks thus appear clearly on each kyogo (here they are in the lower right, and upper right). It is thus a simple matter to carve matching registration marks on each colour block. The colour of the marker or pen used for these kyogo has absolutely no connection with the colours that will appear in the final print. It is chosen for clarity. In the 'old days' a vermillion pigment was commonly used. | |
|
|
|
|
|
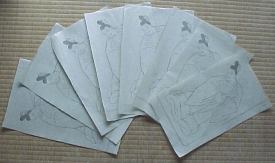
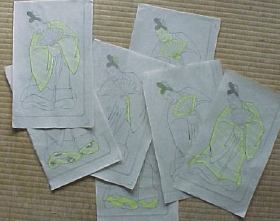
Here's the entire collection of kyogo for this print. There are seven sheets, one of which carries two colours (see above). The 'coloured in' areas actually overlap in a couple of cases. These indicate places on the finished print that will be receiving colour from more than one block (overprinting). |
| |
|
|
|
|
|
|
When they are all done and checked for omitted spots (a very easy mistake to make), they are pasted face down onto new blank blocks in the same manner as the original hanshita. While the glue is still damp, a great deal of the paper fibre can be peeled from the back of each sheet, making the lines much more visible. | |
|
|
|
|
 | ||
|
In a print like the one in this example, with some very small areas of colour, it is not necessary to use a fresh large block for every sheet. It is usually possible to arrange the kyogo in such a way as to allow a number of colours to be combined on each wood face. Once they are all in place, and the glue has dried thoroughly, it's time for more carving! | ||