How I Make a Woodcut
(entry by Carl Homstad)
 |
 |
 |
 |
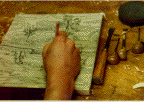
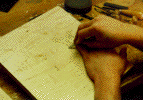
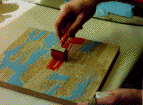
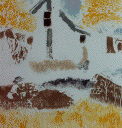
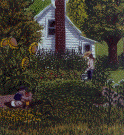
This series of photos shows my basic process. The first photo shows transfering the design to the piece of plywood with tracing paper and carbon paper. The second photo shows the carving of the block. The third photo is of inking the block. Note that the same block can be inked with more than one color. The fourth picture shows the block and the print after going through the press. This is how one block is made and printed. Usually, I use four blocks. The following photos show how the four blocks are printed alone and then together to make the print "In The Garden."
|
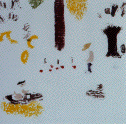
Impression of first colour block |
|
|
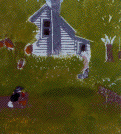
Impression of second colour block ... |
The two combined ... |
|
Impression of third colour block ... |
The three combined ... |
|
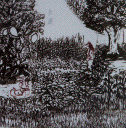
Impression of the key block ... |
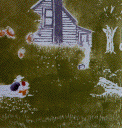
The four combined ... |

The Details
The first step is to make a colored pencil drawing or watercolor study of the image. Cut four pieces of birch plywood the same size as the study and each other. Stain them light brown so you can see where you have carved. Then trace the image on tracing paper, turn the paper over to reverse the design, and transfer it to one of four pieces of plywood using carbon paper. The key block is carved first, and usually printed last. It should contain the most details. Outlines of the all color areas should be left on the block at this point to transfer to the tint blocks and then some can be cut away before the edition is printed. After the key block is printed transfer the image to the other three blocks, the tint blocks, by offset printing. Print the key block on tracing paper and then carefully line up that print ink down on the next block and transfer the ink with a press or by rubbing with a wooden spoon. Repeat for each block. Make a list of all the colors and make sure each color can be printed on one of the blocks. I use four blocks because I can print an area three times and leave it alone once to print up to it. Usually the first block prints background colors and dark colors in the shadows, the second prints the overall medium tones, the third prints spot colors and highlights, and the fourth, the key block, prints the outlines and details.
Advanced Techniques
Transparent Colors: You can make your own oil based ink by adding EXTENDER made by Graphic Chemical & Ink to oil paint. You can make it more transparent by adding WINTON OIL PAINTING MEDIUM made by Windsor Newton and more EXTENDER to keep it tacky. I used transparent white to print the snow on Winter Storm Warning, and transparent brown to print the water on The Trout so you could still see the bottom of the creek.
Gradations
To print gradations I take a brayer that is about one third the width of the gradation and fill it with ink on the ink slab. I then ink the block starting at the darkest end and then roll back and forth a quarter inch or so further each time. Roll out the gradation on the block not the ink slab. Often, for a sky I will roll a gradation of light blue up on one block and a medium blue down on another, print grey behind the clouds on a third and transparent white on top on the fourth.
For me a color woodcut print is a three-part creative experience. First there is the creation of the image itself. Second, the wood blocks must be prepared and carved for all the colors, lines, and shapes to become one in the final, third part of printing. This entire cycle takes anywhere from a week to a month, depending on many factors.