My Technique for Color Woodcut Prints
(entry by Mike Spollen)
 Block printing has been in existence
for a long time - ancient Chinese woodcut prints, the Middle ages of
Western Europe into the seventeenth century, Japanese Ukiyo-e prints
of everyday life - and has continued today. My techniques for color
woodcut prints are similar to most traditional methods used,
employing some modifications in my technique based on my personal
preferences, how I develop the imagery and other variables. This
brief overview assumes you understand basic block printing methods;
using cutting tools, inking the block and printing the final
image.
Block printing has been in existence
for a long time - ancient Chinese woodcut prints, the Middle ages of
Western Europe into the seventeenth century, Japanese Ukiyo-e prints
of everyday life - and has continued today. My techniques for color
woodcut prints are similar to most traditional methods used,
employing some modifications in my technique based on my personal
preferences, how I develop the imagery and other variables. This
brief overview assumes you understand basic block printing methods;
using cutting tools, inking the block and printing the final
image.
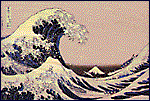
For me a color woodcut print is a three-part creative experience. First there is the creation of the image itself. Second, the wood blocks must be prepared and carved for all the colors, lines, and shapes to become one in the final, third part of printing. This entire cycle takes anywhere from a week to a month, depending on many factors.
Developing an image suitable for
multicolored block printing.
As I develop an image in one medium,
sometimes it translates well into another, such as woodcut printing.
Sometimes not. Woodcut prints define mass, shapes, line and color.
Keeping this in mind and understanding how best to use it is an
important part of the medium. As I prepare the image for a woodcut,
key elements of the composition are defined and maintained. This is
not to say that some variables are not allowed for in the process - I
usually give about 50% of the image carving development strong
guidelines, the other 50% is determined as I go along.
 Preparing the wood
blocks
Preparing the wood
blocks
I choose the size of the print and
cut the necessary number of blocks I think I will need (I usually cut
an extra one, just in case). I prefer cherry wood, but sometimes I
also use a laminated plywood with a cherry veneer for cost-saving
reasons, particularly on larger pieces. Pine wood is soft and yields
good prints in short runs, but requires care when cutting against the
grain. Poplar is also a fine wood. Each block is cut to the exact
same size. I then match up a corner and mark all blocks on this
corner. This becomes the key corner that all blocks are aligned to.
Next I stain the carving surface of the blocks with a tone of ink or
watercolor (any stain will do) and allow to dry. This will allow me
to see what areas have and have not been cut, as the cut areas will
be lighter than the stained uncut areas.
Making the key block
Once the primary image has been
determined, I transfer it to a wood block. I always redraw the image
from sketches on the block using india ink or a dark waxy pencil -
occasionally I will use a white waxy pencil also to accentuate
highlighted areas. There are other methods of transferring an image
onto the block, but I prefer to actually redraw on the block so as to
get the feel of the wood surface, making last minute adjustments and
mentally tuning myself to the task of carving. I take into
consideration the grain of the wood, knots and other characteristics
of the wood and the image. After I carve this block, the image of
this block will be used on the other blocks to maintain registration
and provide location of colors, etc. Usually this block will be the
final printed block that pulls the entire image together, but not
always.
 Transferring the key
block image to other blocks
Transferring the key
block image to other blocks
The Japanese method is to print the
image on as many thin sheets of paper as there are blocks, then
carefully paste them down on the other blocks and use as the guide.
For my style of work, I doubt that the pasted paper would hold for
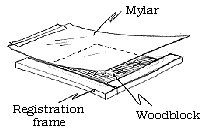
the duration necessary on each block. My method is to use a
registration frame (also used for final printing) or some variation
of, to consistently place all blocks in the same place. I securely
mount a sheet of mylar to the frame or nearby which will lay over the
block in the same position repeatedly. After inking the first block,
I lay down the mylar, rub and transfer the image to it, lift it
without unmounting it, remove the inked block and place a clean blank
block in its place. I lay down the mylar onto the new block, and
transfer the wet inked image from it onto the clean block. I repeat
this on as many blocks as necessary.
Making additional blocks
After all the blocks have dried, I
use the printed image on each as a guide to carve the blocks. If
necessary, I will repeat the transfer of any block's image to another
block by the method described above, using a different color ink to
keep track of different information. Care is taken to overlap colors
a small amount (trapping) where necessary. I also cut up some blocks
into separate sections to be inked individually and reassembled for
printing. I use a fine jigsaw blade to keep the cut line width to a
minimum.
Time to take a break. At this point I've made it two thirds of the way there. But the work isn't over yet. A successful wood block print relies as much on the sensitivity of the printing, color choices, transparencies of given colors, their order of printing and accurate registration as it does on the carving and number of colors.
Preparing to print
I determine the number of prints I
will make and cut the number of sheets of fine quality block printing
paper needed, allowing a few extra for rough prints. Also, I cut up
some smaller scrap sheets to test with - as the printing develops, I
need to test color combinations side-by-side and overlapping
combinations and transparency and I can never have enough test
scraps. I clean all areas of the studio (but dust still gets in) and
set out everything for easy reach.
Keeping the blocks aligned to each
other
As I mentioned earlier, I use a
registration frame to keep each block positioned in exactly the same
place each time. This is simply an L-shaped frame or facsimile that I
mount to a work table. I put the corner marked on each block in this
frame corner. Next I determine the best method for keeping the paper
consistently registered to the blocks.
 Keeping the paper
aligned
Keeping the paper
aligned
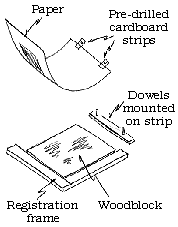
I use several methods for keeping the
paper registered properly. The goal is to consistently place the
sheet down on the block in exactly the same place every time. A
choice of method depends on the size of sheets and its manageability.
For smaller prints I mount a paper guide along one or both of the
outer edges of the registration frame. This works well, keeping the
block and the paper both positioned in the same corner. For larger
prints I use a method similar to prepress offset printing methods.
This yields very good registration when set up properly. I set up
several dowels along a mounted strip near an edge of the cut paper.
On each sheet of paper I mount pre-drilled cardboard strips which
register to the dowels. Holding the paper up and placing the
cardboard strips onto the dowels, I can then lay down the sheet over
the block in the same position every time.
Inking the blocks and printing
With everything set up for consistent
alignment, this is the final point of woodcut printing. Here I
experiment with different color combinations until I have achieved
the desired effect. Sometimes I create several effects that are
equally powerful, yet uniquely different, from the same blocks of
wood. The only restriction is time - mixing ink, cleaning rollers and
re-inking all takes time. But, then, that's what I like to do.