Today's postings
- [Baren 41092] Re: From: Jill Smith
- [Baren 41093] Re: Repairing cherry woodblock? (l k)
- [Baren 41094] fixing mistakes (Claudia Coonen)
- [Baren 41095] Re: Repairing cherry woodblock? (eli griggs)
- [Baren 41096] Question on Ink, Lino, Sharpies (Constance Brewer)
- [Baren 41097] Baren Member blogs: Update Notification (Blog Manager)
- [Baren 41098] Re: Question on Ink, Lino, Sharpies (Maria Arango Diener)

Message 1
From: aqua4tis # aol.com
Date: Mon, 19 Apr 2010 13:21:16 GMT
Subject: [Baren 41092] Re: From: Jill Smith
Send Message: To this poster
Message 2
From: l k
Date: Mon, 19 Apr 2010 16:19:39 GMT
Subject: [Baren 41093] Re: Repairing cherry woodblock?
Send Message: To this poster
~~ Did you read this, from John Amoss?
http://barenforum.org/encyclopedia/entries/006_04/006_04.html ~~
no, this didn't come up with my search....
My 26.8kbps dial-up, land line connection with an eratically disconnecting connection
has a lot to do with inefficient searching.
Linda
lindakelen-artings.blogspot
Message 3
From: Claudia Coonen
Date: Mon, 19 Apr 2010 17:09:57 GMT
Subject: [Baren 41094] fixing mistakes
Send Message: To this poster
I have had (like all, my share of mishaps carving) those oops moments. I
tried the wood filler, very clumsy, and didn't print the same as the wood.
In Rebecca Salter's class she said take the piece you cut out (if you can
find) and glue it down with woodglue. I used a pin(or tweezers) and another
wood chip to put the glue in place. It's a "all thumbs" situation, but if
you get it to work it's great. I carved another(shaving) piece one time and
glued it down, and then carved a little so it looked more harmonious with
the rest of the block, it didn't look great but the print, it was ok.
I like the idea of the whole block, like Dave sent in the link, if you had
a big area.
good luck
Claudia Coonen
Message 4
From: eli griggs
Date: Mon, 19 Apr 2010 19:24:09 GMT
Subject: [Baren 41095] Re: Repairing cherry woodblock?
Send Message: To this poster
I use a thin bladed Japanese back-saw, a dozuki, to cut one or more thin slices off the face or back of the block, if necessary, from an area that will be cleared in the carving, after the blocks final surface(s) is prepared with shellac (or other material).
This piece is about 4-6mm thick and needs to be made evenly thick with a sanding block or hand plane. I use planes but a thick piece of acrylic, plate-glass or wood can serve as tools as well.
Use some double-sided tape to fix the FINISHED side down to a smooth, flat steady surface, like a granite counter or piece of glass secured to a table-top and use a hand-plane (never an electric plane!) to even up the cut-side of the wood so the repair piece is uniformly thick.
Work slowly and if necessary, use some double-stick tape to fix thick bits of paper/card to the sole of the plane as spacers, just be sure they are as thick as you want your wood to be and are placed so the tool will glide smoothly and evenly across the supporting surface, not the piece being trimmed. Be careful to plane in the correct direction, with the grain, to avoid tear-out and mind your blades' edge. Attack the wood with the blade at an acute angle, not straight on so you have a good, smooth slicing action.
You can also easily use a block of wood with paper/card spacers and sandpaper as well, about 80 grit should serve well enough. Sandpaper can be quickly tacked to a wooden blocks' sides.
When I need to make a repair, I first carve-out the section needing replacement, using a home-made "old-woman's tooth" to get the final depth correct. Then, using a bit of putty eraser or molding clay to make an impression of the receiving cutout section, I use an ink-pad to ink the putty impression which I stamp onto the back-side of the replacement chip so I have a clear outline to trim to. I again use the dÅzuki to cut out the chip, which is usually a good fit. The important thing to remember about a dÅzuki is that, it cuts very cleanly, so there is no need to sand cut-lines. A toh will do the job just as well.
If I did my part well, the chip will press into the cleared section and slow curing gel-'super-glue' allows for a thin glue-up. I also place a small weighted block of granite, glass or tile over the repair so as to keep everything flat and in plane with the upper surface of the block when pressing in the glued piece.
Here are links to tools.
Back-saw - http://www.leevalley.com/wood/page.aspx?c=2&p=32935&cat=1,42884
One type of "old woaman's tooth" - http://www.inthewoodshop.com/ShopMadeTools/OldWoman'sTooth.html
Super-glues - http://www.leevalley.com/wood/page.aspx?c=2&p=20026&cat=1,110,42966
Cheers, Eli
Message 5
From: Constance Brewer
Date: Tue, 20 Apr 2010 05:01:44 GMT
Subject: [Baren 41096] Question on Ink, Lino, Sharpies
Send Message: To this poster
not wanting to stick very well to the lino block, let alone the prints.
It's a dark brown (Graphic Chemical Water Soluble Brown) and even in the
can it's the consistency of Hershey's syrup. It just drips off my knife.
I've tried stirring it up, and it stays syrupy, after rolling it out, it
never quite gets to what feels like the proper tack. Is there something
I can do/add? What am I doing wrong? -- Colors one and two went on fine,
and the inks were a much thicker consistency.
I did notice even after I cleaned the block the ink didn't want to stick
at all to the places I used a Sharpie to color in. Coincidence? All the
recent talk about Sharpies made me wonder. This is the second print this
month where using a Sharpie seemed to cause problems. I'm using Daniel
Smith Gold Cut lino, I didn't notice a problem with the battleship gray
I used previously. Has anyone else had this problem? I like being able
to sketch directly on the block, but not if it causes problems later on.
Connie Brewer
-------------------
Life On The Periphery
http://peripheryarts.blogspot.com
Message 7
From: Maria Arango Diener
Date: Tue, 20 Apr 2010 12:57:27 GMT
Subject: [Baren 41098] Re: Question on Ink, Lino, Sharpies
Send Message: To this poster
surface always seemed "oily" to me and much too slick. Some of my
books recommend sanding the lino and washing it well with a detergent
soap prior to drawing and carving.
Sharpie is nothing but ink and a very volatile solvent; I doubt the
marker itself is the problem but the marker may be incompatible with
the lino.
Now the ink does seem way too thin. Try a water soluble thickener or
tack reducer. One problem at a time so that you know what is causing
you grief.
Maria
Sent from my iPhone
Digest Appendix
Postings made on [Baren] members' blogs
over the past 24 hours ...
Subject: Mystique Series - fixing the cases
Posted by: Dave Bull
|
Time to fix the cases! With the first batch of prints now done (actually still sitting under the drying boards, waiting to be trimmed, etc.), it's time to figure out what to do with the cases. There are two parts to the job - gluing the inserts into the drawers, and widening the slot for the acrylic panel. The guys at the wood shop sent over a box of inserts cut to the correct size, and they have done a magnificent job - the pieces are exactly the right size. I did a test on one drawer, and the four pieces just perfectly squeezed into place. That part of the job should go with no problems. But widening the slot is a lot more complicated. I spent this morning in the usual three-step procedure: think about various approaches, decide on one of them, and then ... do it! I made a quick bike trip to the nearest 'home center' (which is actually not all that 'near' - around a 30 minute hard ride ...) and picked up a small hand-held trimmer/router kind of tool, then built a jig so that I could cut the slots accurately. Here's how it turned out: The scene of the crime - down in my 'first basement', the room that mostly serves as a storeroom. I'm going to work on the top surface of my table saw: 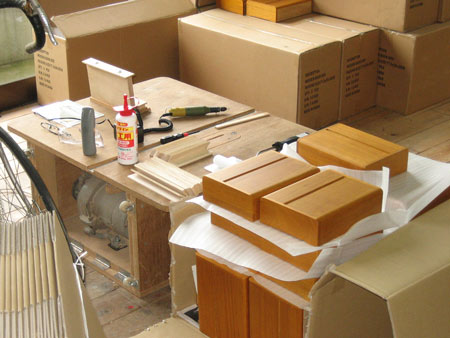 Here's a shot with all the tools, etc. laid out. We'll step through the procedure in the subsequent photos ... 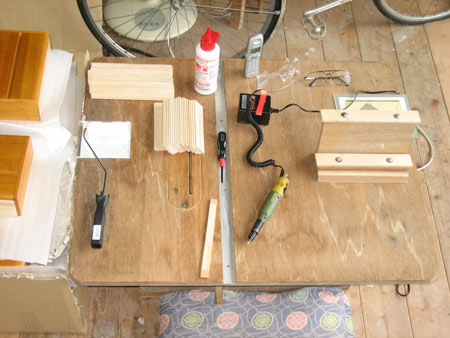 Here's the main jig. It has three 'points of contact' for the trimming tool, two slanted edges to hold it at the correct angle and a base piece to control the depth. The guide pieces have slots (hidden under the washers) so that their position can be adjusted by loosening/tightening the screws. 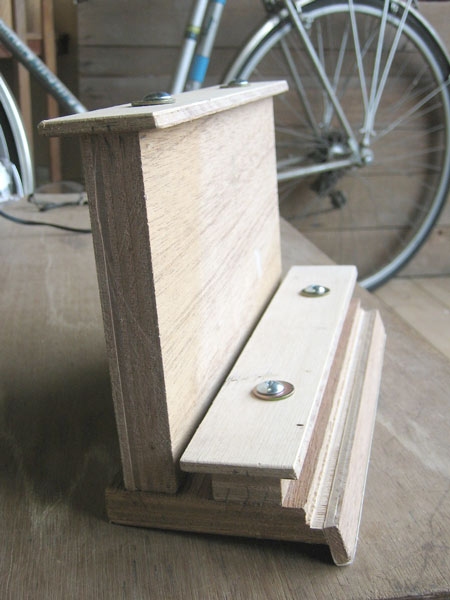 The small 'lip' piece at the front of the bottom of the unit slips right down into the slot on the top of a case. It sits very firmly, and needs no further clamping. 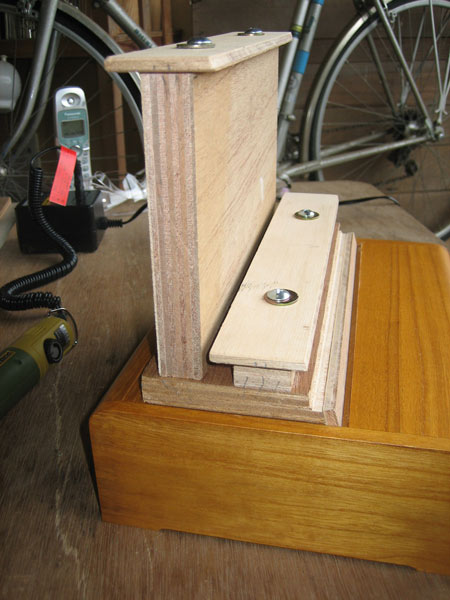 Here's how the tool will 'ride' along the guides: 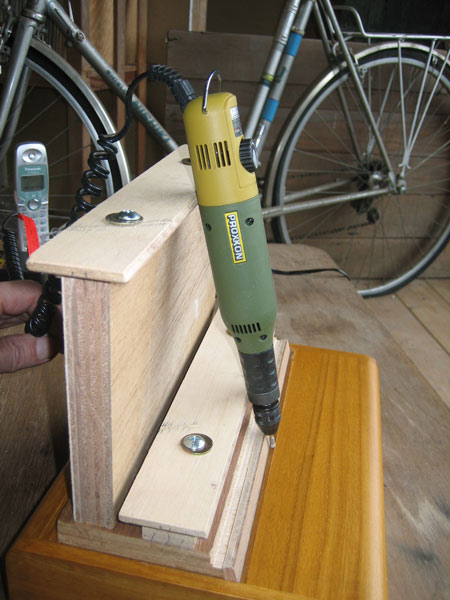 OK, let's have a go! First step is to inspect four insert pieces, so see which orientation is best (some are slightly warped and thus need to be inserted in a particular direction to glue securely). 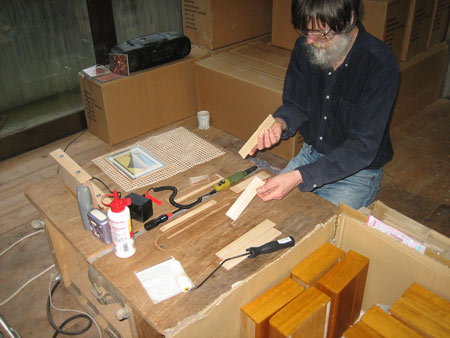 Grab a case from the input pile, and put the drawer on the left workstation . . . |
This item is taken from the blog Woodblock RoundTable.
'Reply' to Baren about this item.
Subject: McClain's Interview
Posted by: Annie B
 McClain's Printmaking Supplies is pretty much my favorite place to shop in the universe, so I was delighted that they interviewed me a few weeks ago for their online newsletter, Hanga News. You can read the interview by clicking here. Check out the back issues too, if you haven't seen the newsletter before. They always have a printmaker interview plus great tips and tricks. McClain's Printmaking Supplies is pretty much my favorite place to shop in the universe, so I was delighted that they interviewed me a few weeks ago for their online newsletter, Hanga News. You can read the interview by clicking here. Check out the back issues too, if you haven't seen the newsletter before. They always have a printmaker interview plus great tips and tricks.Copyright Woodblock Dreams blog
|
This item is taken from the blog Woodblock Dreams.
'Reply' to Baren about this item.
Subject: Test Print -- Color Two
Posted by: Ellen Shipley
 I see where I have to carve away some incidental lines that shouldn't be printing, like on the cloud. But otherwise I think it's pretty good. So far so good. ;- j I'm actually amazed it's working more or less how I planned it. ;-> We'll see when I get to color three. |
This item is taken from the blog Pressing-Issues.
'Reply' to Baren about this item.